
Before diving into Data Bridge, ensure you have met the prerequisites. To get started click here.
The Data Bridge is available for Basic plans or higher, not for Go plans.
The Data Bridge allows you to establish a connection between a local data source and a cloud destination, specifically a Viz Flowics Data Input. To achieve this, the Data Bridge needs to be configured to specify where to retrieve the data (the source) and where to channel it (the destination: data input). This configuration is done in the Data Bridge Middleware Source.
Once activated, the Data Bridge reads the local data source and streams or pushes it to a Viz Flowics Data Input. This process ensures data availability so you can connect it to a Viz Flowics Graphics Package.

Data Flows from a local environment to the cloud.
The Middleware is configured in the cloud but runs locally.
Supported Local Sources
Sources can be:
A local JSON file (
file:///).A local CSV file (
file:///): Ensure the file uses a comma,as a field separator with no string quotation.A local TSV file (
file:///): Ensure the file uses a tab\as a field separator with no string quotation.A local REST API exposing data in JSON format (
https://).A local WebSocket (
wss://)Other sources that are tied to Viz Flowics' native data connectors.
By default, local files are read using UTF-8 encoding.
When reading from a remote location (https://), the Data Bridge attempts to use the Content-Type header (respecting the optional charset parameter. In the absence of such a parameter, UTF-8 is used.
The Data Bridge currently does not support reading data in XML file format.
Destination in the Cloud: Data Inputs
The Data Inputs serve as the cloud repositories where local data resides. Think of them as virtual cloud folders or baskets where the Data Bridge deposits the data. The inputs can be:
JSON HTTP push - Content.
Streaming Push - Content.
Custom data inputs that required Data Bridge.
Refer to the Use Cases section for detailed information on data input configuration and the suitable input based on the scenario.
Getting and installing the Middleware
Keep in mind that, for Data Bridge usage, a minimum Middleware version of 6.0 is required. For integrations with CSV/TSV local sources, you must run at least Middleware version 6.0.7.
For installation instructions, consult the User's Manual by clicking here.
When configuring the Viz Flowics Middleware, ensure you select Data Bridge as the integration mode:

Data Bridge Use Cases
Based on your data source, whether it's a JSON file or a local REST API, locate all the necessary information to seamlessly execute the data integration outlined below:
JSON file use case
JSON file use case
This use case illustrates data retrieval from a JSON file generated by an external application responsible for processing results from an external data provider. The data bridge can be configured to read the local file every N seconds and send the to a destination (Viz Flowics data input). The MW will do that regardless of any changes to the local JSON file.
Setting up Data Input JSON HTTP Push - Content
Navigate to the Data Connectors section in the Top Bar Menu and select Data Inputs. Choose to Add the JSON HTTP push - Content.
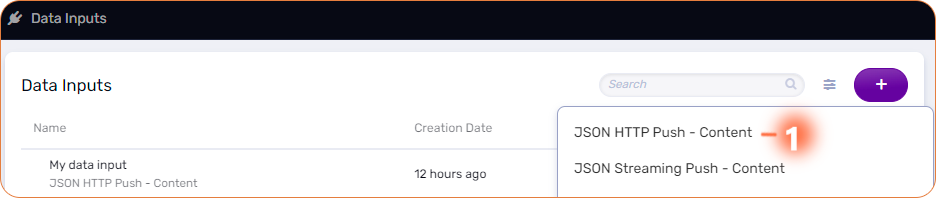
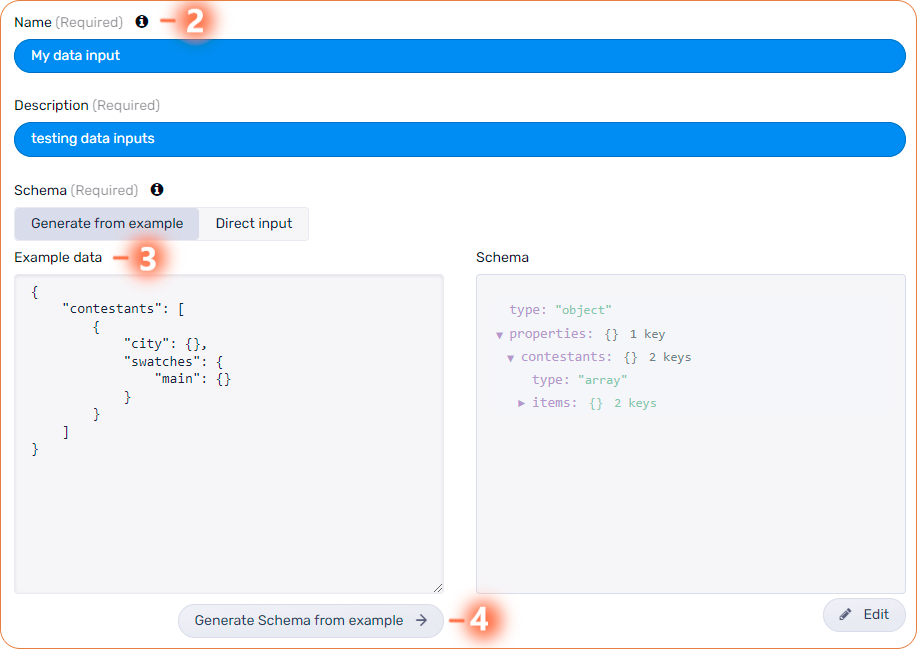
2. Assign a name for identifying the input.
3. Paste the content for your JSON in the example data box.
4. Click on Generate a schema from the example to generate the schema.

5. Control Access - Allowed CORS Origin: This allows data to be pushed from the browser directly to Flowics from other webapps. Can be tested with an OPTIONS request: curl -i -X OPTIONS -Horigin:http://xx -HAccess-Control-Request-Method:POST https://discover.flowics.com/… for more info about the OPTIONS method click here
6. Control Access - Allowed IP Networks: Allows to receive only data from certain hosts on the internet. The list can contain individual IP addresses (IPv4/IPV6) 192.168.0.1 or networks 192.168.0.0/24

Adding the Middleware Source
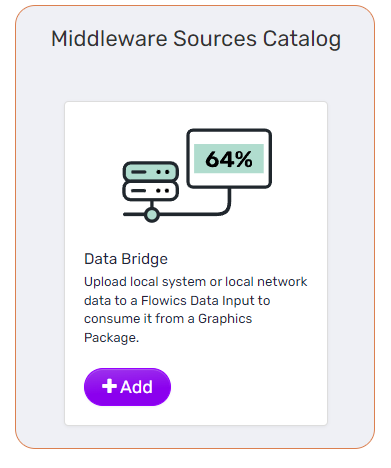
Add a new Middleware Source.
From the catalog of Middleware sources choose Data Bridge. If it is not available please contact the Support team.
Setting up Middleware Source
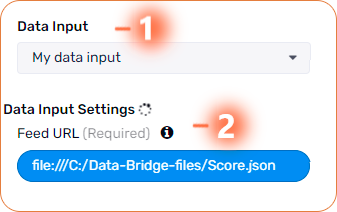
1 Choose the data input
2. Enter the path where the local JSON file is located. You need to add the following format: Example: file:///C:/Data_Json/File.json
3. Middleware configuration. Click on the configure integration button to connect the middleware.
4. Enable the toggle to activate the middleware data source.
5. Select the Data Bridge (Middleware) to which the Middleware source will be connected.

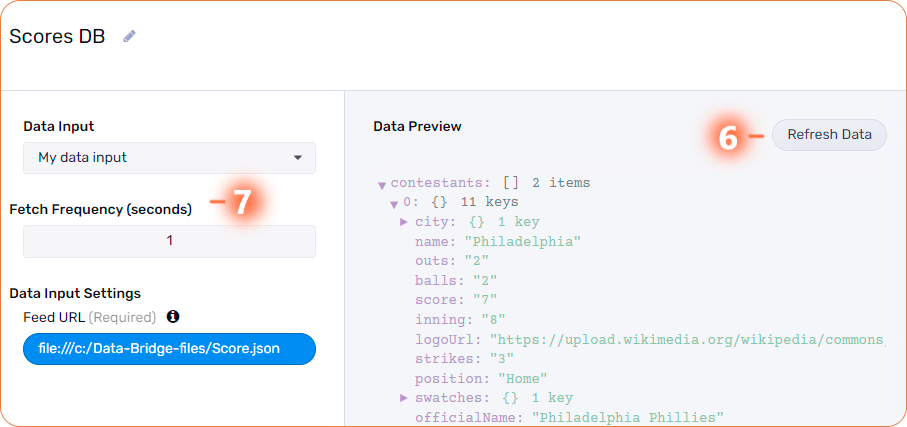
6. Click on the refresh button to preview the data.
7. Set the Fetch frequency (data update) in seconds. The lowest value you can input is 1 second.
You are all set. Now is the time to integrate your data within your Viz Flowics graphics packages.
Local Rest API use case
Local Rest API use case
This use case illustrates the retrieval of data from a local Rest API that exposes data in JSON format generated by an external application responsible for processing data from an external data provider. The data bridge can be configured to read the local file every N seconds and send the to a destination (Viz Flowics data input).
Setting up Data Input JSON HTTP Push - Content
1 Navigate to the Data Connectors section in the Top Bar Menu and select Data Inputs. Choose to Add the JSON HTTP push - Content.
2. Assign a name for identifying the input.
3. Paste the content for your JSON in the example data box.
4. Click on Generate a schema from the example to generate the schema.
5. Control Access - Allowed CORS Origin: This allows data to be pushed from the browser directly to Flowics from other webapps. Can be tested with a OPTIONS request: curl -i -X OPTIONS -Horigin:http://xx -HAccess-Control-Request-Method:POST https://discover.flowics.com/… for more info about the OPTIONS method click here
6. Control Access - Allowed IP Networks: Allows to receive only data from certain hosts on the internet. The list can contain individual IP addresses (IPv4/IPV6) 192.168.0.1 or networks 192.168.0.0/24
Adding the Middleware Source
Add a new Middleware Source.
From the catalog of Middleware sources choose Data Bridge. If it is not available please contact the Support team.
Setting up Middleware Source
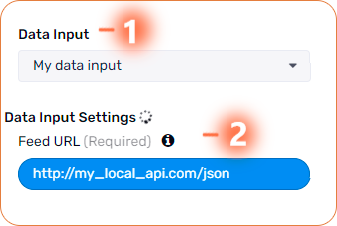
1 Choose the data input
2. Enter the path where the local API is located. You need to add the following format: Example: http://my_local_api.com/json
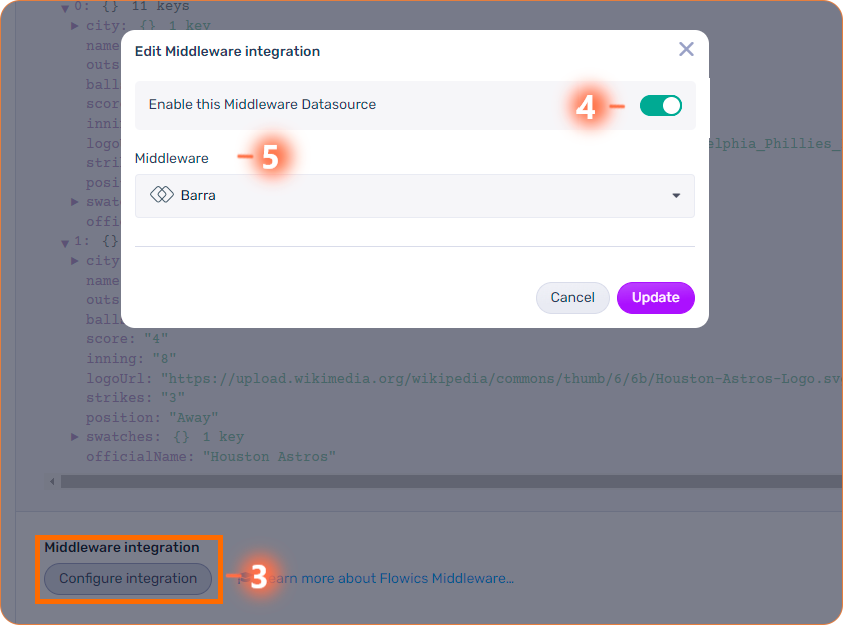
3. Middleware configuration. Click on the configure integration button to connect the middleware.
4. Enable the toggle to activate the middleware data source.
5. Select the Data Bridge (Middleware) to which the Middleware source will be connected.
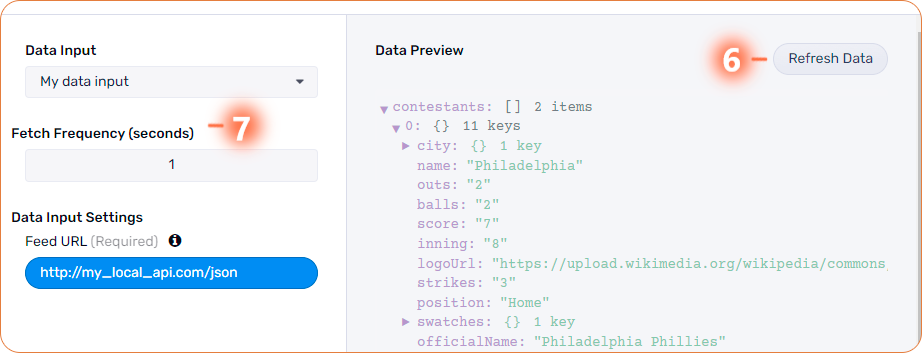
6. Click on the refresh button to preview the data.
7. Set the Fetch frequency (data update) in seconds. The lowest value you can input is 1 second.
You are all set. Now is the time to integrate your data within your Viz Flowics graphics packages.
CSV/TSV file use case
CSV/TSV file use case
This use case illustrates the retrieval of data from
A local CSV (Comma-Separated Values)
A local TSV (tab-separated values).
Setting up Data Input JSON HTTP Push - Content
Navigate to the Data Connectors section in the Top Bar Menu and select Data Inputs. Choose to Add the JSON HTTP push - Content.
2. Assign a name to identify the input.
3. Create the schema from the data in your CSV. To do so, you can use a tool to convert the CSV to JSON. For example, this converter.
Once you have the JSON file, paste its content in the example data box.
4. Click on Generate a schema from the example to generate the schema.
If you get error messages saying that it was receiving an Integer but expecting a String, you need to change everything to "String" in the Schema.
5. Control Access - Allowed CORS Origin: This allows data to be pushed from the browser directly to Flowics from other webapps. Can be tested with an OPTIONS request: curl -i -X OPTIONS -Horigin:http://xx -HAccess-Control-Request-Method:POST https://discover.flowics.com/… for more info about the OPTIONS method click here
6. Control Access - Allowed IP Networks: Allows to receive only data from certain hosts on the internet. The list can contain individual IP addresses (IPv4/IPV6) 192.168.0.1 or networks 192.168.0.0/24
Adding the Middleware Source
Add a new Middleware Source.
From the catalog of Middleware sources choose Data Bridge. If it is not available please contact the Support team.
Setting up Middleware Source
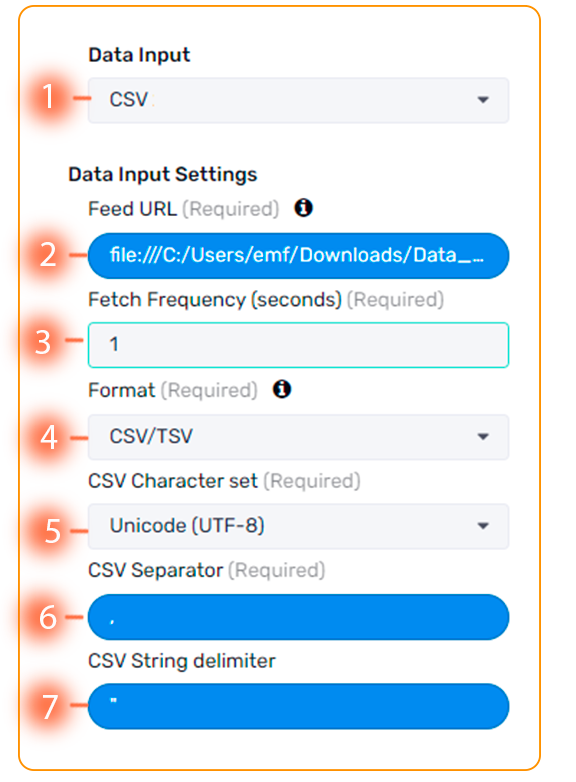
1. Choose the data input.
2. Enter the path where the local CSV/TSV file is located. You need to add the following format: Example: file:///C:/Data_File/File.csv
3. Set the Fetch frequency (data update) in seconds. The lowest value you can input is 1 second.
4. Select CSV/TSV format.
5. When reading from local files (file:/// URLs) by default The Viz Flowics Data Bridge reads the files using UTF-8 encoding.
6. If the file extension is CSV enter (,) as field separator and no string quotation. If the file extension is TSV enter (\) field separator and no string quotation.
7. Enter (") as CSV string delimiter.
8. Middleware configuration. Click on the configure integration button to connect the middleware.
9. Enable the toggle to activate the middleware data source.
10. Select the Data Bridge (Middleware) to which the Middleware source will be connected.
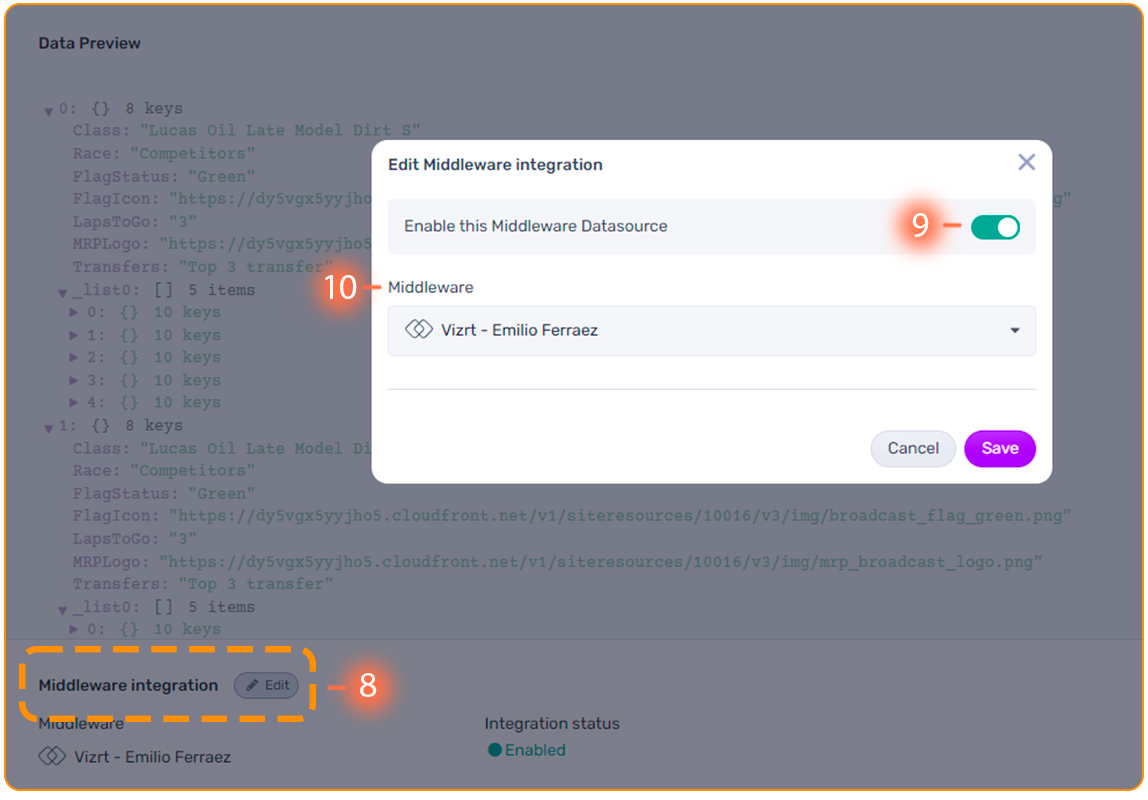
11. Click on the refresh button to preview the data.
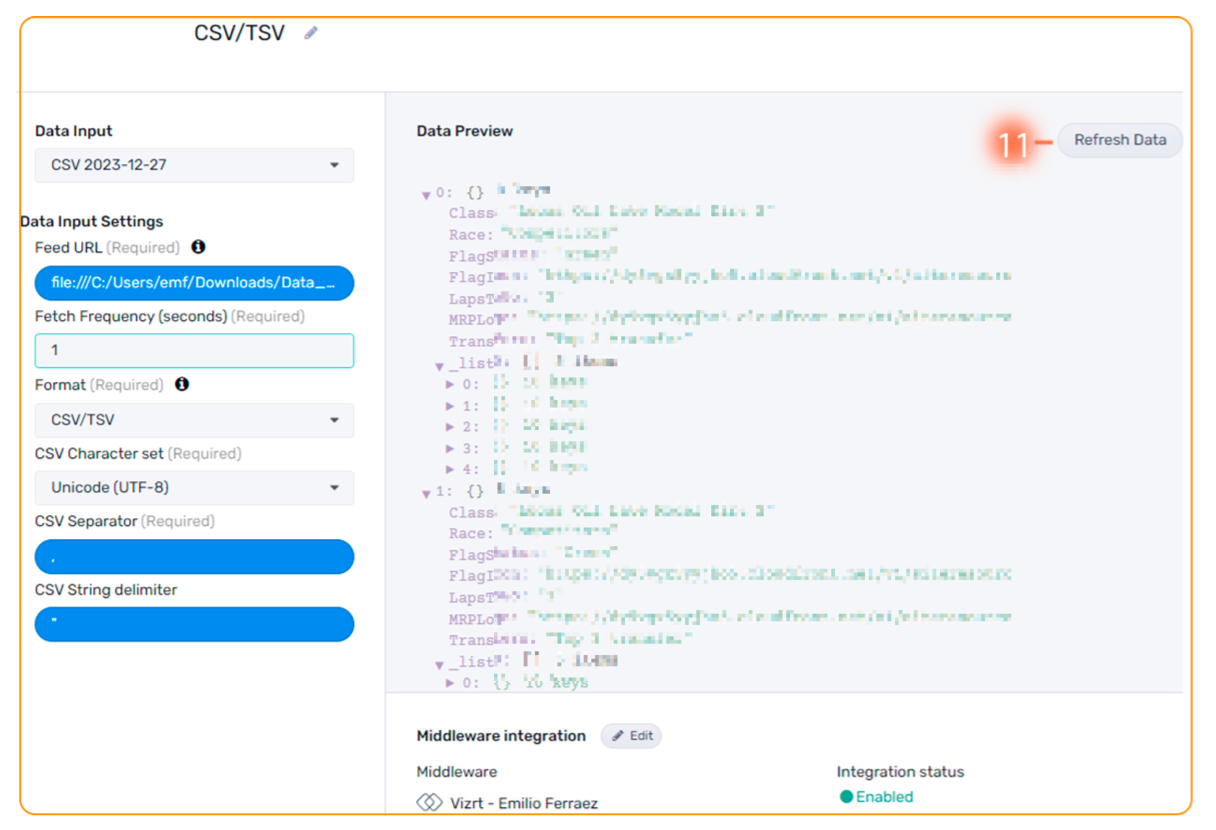
You are all set. Now is the time to integrate your data within your Viz Flowics graphics packages.