
This article provides a step-by-step guide on creating macros in Viz Vectar Plus/ TriCaster that can automate various actions in Viz Flowics through the Control API. These actions include overlay transitions, timer updates, and Google Sheets data syncing.
It's important to note that the integration between Viz Flowics and Viz Vectar Plus requires version 1.3 or higher of Viz Vectar Plus. Make sure you have the correct version installed before attempting this integration.
The macros will work on all current TriCaster versions, going as far back as "Advanced Edition 2" releases (Rev 5-1).
Requirements
Here are the requirements for this integration:
For integrations through Livelink, you need to be running Vectar v1.3 or TriCaster Rev 7-9 or higher.
If you are running anything earlier, you need to go through the NDI workflow. For this, you need to download the Flowics NDI converter APP here.
Token of the graphics package. Learn how to get the token by clicking here.
Control API. Check the full API documentation here.
Downloading and Installing Viz Flowics Macro Control Plugin
Please download the Macro Control plugin by clicking the button below:
Unzip / decompress / extract compressed folders using the right mouse button
Run "Install Flowics.bat" as administrator. The installer will automatically detect if your system is a TriCaster, Viz Vectar, or NewTek VMC1 and place the files in the correct location.
A command prompt will appear to confirm that the files have been successfully copied.

Creating Macros in Viz Vectar Plus / TriCaster
The procedure below applies to Viz Vectar Plus and TriCaster.
1. To create macros in Viz Vectar Plus / TriCaster, open the menu Configure Macros and create a new macro for adding external system control

2. Then, create a new folder where you'll save the Flowics Control Macros
3. Click on the new macro button and follow the instructions to complete the process

Macro Overlay Control
Macro Overlay Control
After clicking on the button of a new Macro the Macro editor will open. You will manually enter the macro information as shown below.
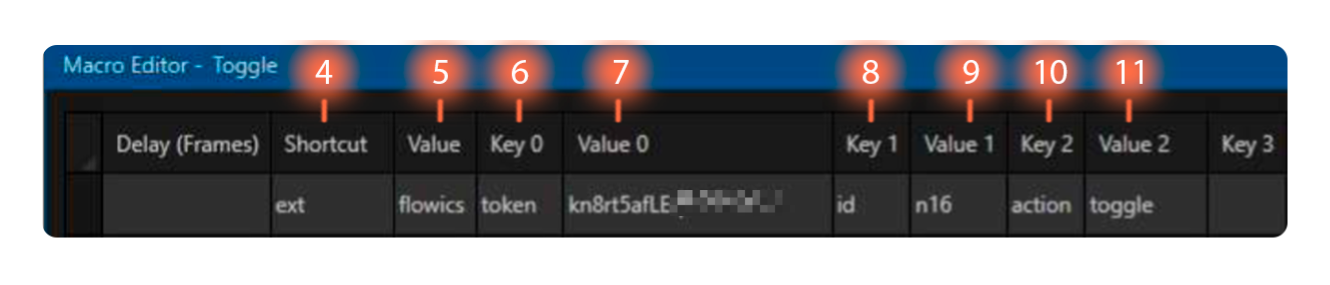
4. The Shortcut field will always be ext.
5. The Value field will always be flowics.
6. The key 0 field will always be token.
7. The Value 0 It is your Graphics token, how to obtain it see the following article.
8. The Key 1 field will always be id.
9. The Value 1 is the node id that you want to interact with. To obtain this value in Graphics you just have to click on the overlay you want to control and in the URL you will find the ID at the end.

10. The Key 2 field will always be action.
11. The Value 2 field could be any of the following actions:
Toggle: Takes an element in or out, the opposite of the current state.
In: Takes an overlay In.
Out: Takes and Overlay Out.
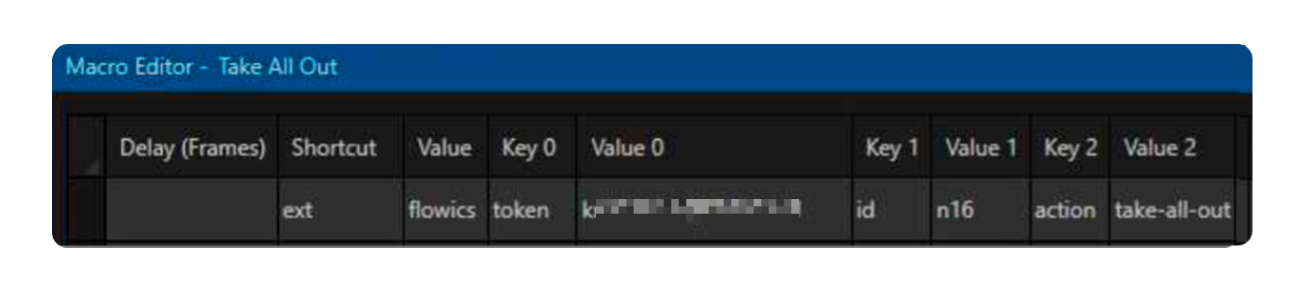
Take-all-out: Takes out all Overlays in current scene.
Example
Action IN

Action take-all-aout
Macro Timer Control
Macro Timer Control
After clicking on the button of a new Macro the Macro editor will open. You will manually enter the macro information as shown below.
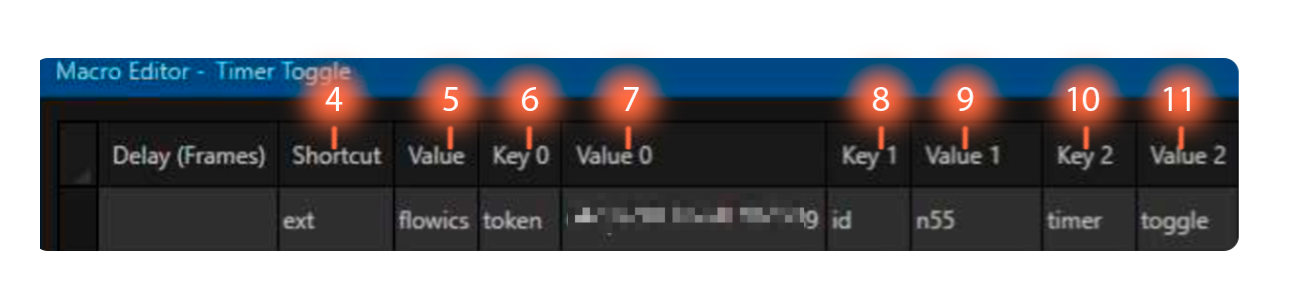
4. The Shortcut field will always be ext.
5. The Value field will always be flowics.
6. The key 0 field will always be token.
7. The Value 0 It is your Graphics token, how to obtain it see the following article.
8. The Key 1 field will always be id.
9. The Value 1 is the node id that you want to interact with. To obtain this value in Graphics you just have to click on the timer provider you want to control and in the URL you will find the ID at the end.
10. The Key 2 field will always be timer.
11. The Value 2 field could be It can be any of the following actions:
play: Starts timer
pause: Pause timer
toggle: Toggle timer state (between play/pause).
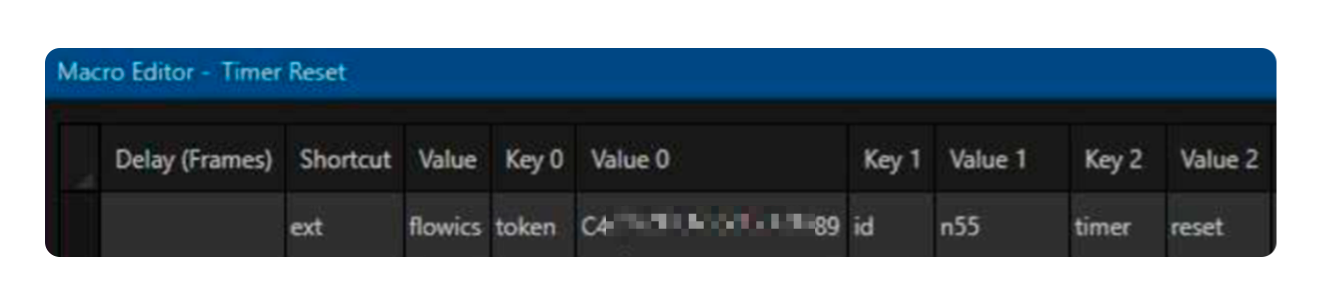
reset: Reset timer to initial value.
Example
Timer reset:
Macro Google Sheets sync
Macro Google Sheets sync
For Google Sheets updates to operate, you must enable Control API: Provider Actions, as well as create an integration ID. For more information consult the following article.
A Google Sheet can be referenced by an element ID (id) or an integration ID (iid). The element ID is the
same as shown above in this document. An integration ID can be manually set in the Viz Flowics interface
when a Google Sheet Provider is selected. Use only one of these methods (id/iid) in the macro.
GSheet sync example using an IID:
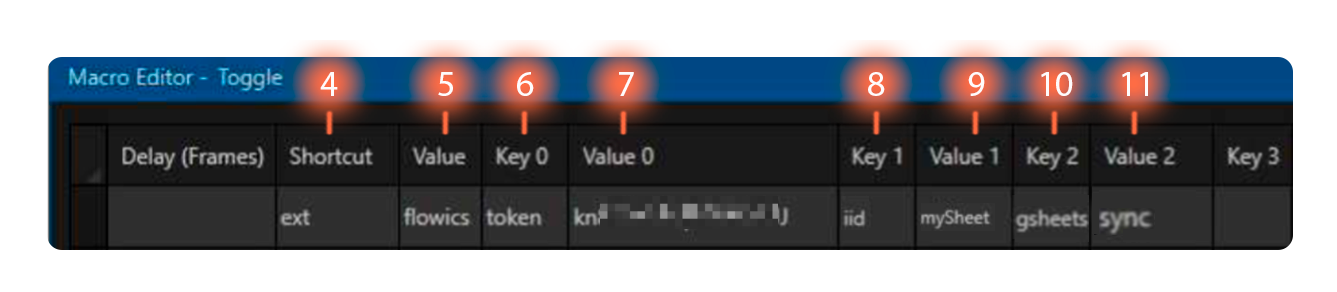
4. The Shortcut field will always be ext.
5. The Value field will always be flowics.
6. The key 0 field will always be token.
7. The Value 0 It is your Graphics token, how to obtain it see the following article.
8. The Key 1 field will always be iid.
9. The Value 1 is the node id that you want to interact with. It is the previously added Integration ID, for more information on how to add an IID here.
10. The Key 2 field will always be gsheets.
11. The Value 2 field could be It can be any of the following actions:
sync: Perform updates of data from Google Sheets. Due to rates limits via Google, do not perform this action more than once per minute.