
Use this Provider to obtain Statistics from a single Flow. It is particularly useful to build graphics such as the Flock to Unlock Widget or the Counter Widget.
Before using a Social Stats Provider, ensure you have already created a Flow.
Remember, an Overlay will be created automatically if you didn't add it to Tree after adding the Provider.
To learn how to add elements to the Tree, click here.
For predefined graphics, we recommend using the Counter or Flock to Unlock Widgets depending on your use case, in any of their available layouts.
Working with a Social Stats Provider
1. Pick a Flow
You may select only one Flow per Social Stats Provider

After adding the Social Stats Provider to the Tree (1), go to the Inspector and click on Pick a Flow (2). In the dialog select the Flow you want use (3).
Once selected, click on the gearwheel icon to edit the Flow or to moderate/curate its content from the Content Inbox by clicking Moderate Flow (4).
2. Configure the Flow behavior

Under BEHAVIOUR you can refine what specific data you want to count from the Flow
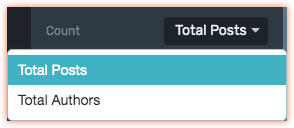
Count Down
Count Down
You can choose to count either the Total Posts or Total Authors (Unique Authors)
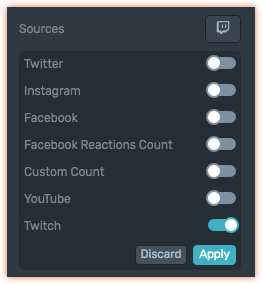
Sources
Sources
According to the Filters you have added to your Flow, the corresponding source will be enabled. Use the toggle control to disable the source(s) you don't want to display in your graphics.
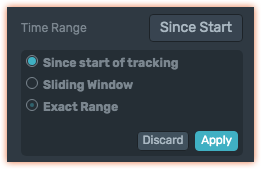
Time Range
Time Range
You can choose between the available time ranges:
Since start tracking: Counts all posts collected by the Flow.
Sliding window: Continuously updates to count posts from the last hour, last day, etc… you set it up once and it keeps updating taking into account the time 'window' you have set.
Exact range: Exact Range: Counts only posts within a specified time frame, useful for events or shows.
Extra Count
Extra Count
Extra Count allows you to add a specific number to the total count. This is useful when designing graphics in the Editor, as it helps visualize how they will look with larger numbers.
It could also be exposed at the remote control to allow the operator to adjust the total count. To do so, enable the Show on Remote Control toggle.
It is specially helpful if you started tracking a Hashtag too late and some posts were missed.

3. Data Binding
From the Social Stats Provider you can bind the following Data:
Count
Flow Name
These values can be used for display or as conditional visibility criteria.
4. Examples of what you can build
Flock to Unlock
Counter

To set up a Flock to Unlock, follow these steps:
1. Add a Progress Bar element below the Social Stats Provider
2. In the inspector, choose Custom Values Mode

3. Bind it to the Flow count
4. Set the Maximum number as the goal to reach for your Flow

5. Customize the layout using a Lower Third Title or other elements.
5. Remote Control & Live Operation.
During a Live event, the Remote Control allows you to:
Change the Flow being used to count
Have more control over the total count if you previously exposed the Extra Count from the Inspector.